A drill press is one of the most versatile power tools in a woodworking shop. It can perform almost all drilling oriented operations with less input, more power, and lots of functionality. It can also perform a lot more than just drilling a hole. In this guide, we will explain some drill press tips and tricks to help you use your machine to its full potential.
Tips & Tricks for your Drill Press
Many professional woodworkers have employed these practices, and we will try to shed some light on a few of these methods in an easy to digest guide. Note that the use of power tools can be dangerous, so please take proper safety precautions. Now, let’s start with six different types of tasks that you can do with a drill press.
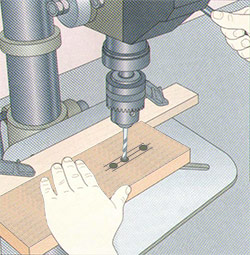
Make perfect holes with a hole saw

A hole saw is a great tool to use with your drill press. It’s useful for boring and cutting large holes or circle openings. However, sawdust usually accumulates, which clogs the saw, causes friction and eventually burns the wood. There are a few ways to help you use a hole saw without burning your wood workpiece.
So the general rule here is not to use dull teeth and clamp the stock down if possible. Set proper RPM speeds depending on the density and the diameter. Don’t use a lot of force and avoid boring a hole in a single pass. Be patient and go slow. Also note that some wood species are prone to burning more than others, such as Maple and Cherry.
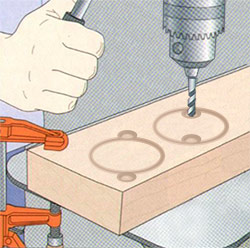
The most common option is to use the two-sided method. To do this, first mark the center of the hole and align the pilot bit of the hole saw. Then start boring but only halfway through. Then, flip the stock and align the pilot bit with the pilot hole created from the other side. Now finish cutting the hole. Cutting from both sides creates a burn-free disc with less tear-out.
Another option is to drill a pair of relief holes to give an escape path for the sawdust. To do this, start by making about 1/16 inch deep cut with the hole saw. Then using a Forstner bit or Brad-point bit, drill a couple of relief holes just inside the kerf. Now, when you resume cutting with the hole saw, the dust will slip out these clearance holes. And if you want to save the inner disk, then you can drill the relief holes just outside the kerf.
Additionally, if your primary purpose is to cut out perfect circles from the stock to make doorknobs or toy wheels, then one of the easiest options is to place the hole saw right at the edge of the stock to create an exit route for the sawdust; nifty and easy.
If you do a lot of wood-boring, then the hole saw can heat up quite fast. To combat this, you can periodically spray the outer and inner teeth of the hole saw. Spray it while it is running with a quick-drying lubricant, some woodworkers also use candle wax.
Also see – drill press reviews
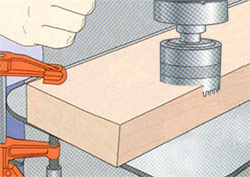
Cut large openings with a circle cutter
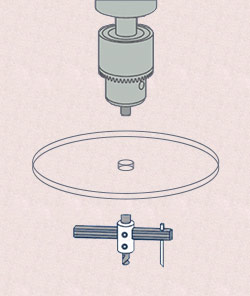
An adjustable circle cutter is another tool that can help you make large-diameter cuts with your drill press. However, the spinning arms of the cutter are daunting and can be unsafe to use. To have a safer workspace and keep your fingers at a distance, you can make a cutter guard.
A cutter guard can be made out of a 1/4 inch transparent acrylic sheet. Make a disc with a diameter larger than the biggest diameter of your circle cutter. Then you can fit the guard disc between the drill press chuck and the circle cutter. This way, you will have a clear cutter guard that will aid in keeping your fingers at a distance and also let you see the work.
The general rule for using a circle cutter is to make sure that your cutter is sharp. This way, it will have less resistance against the grain and give smoother cuts. Properly adjust the radius and the depth of the drill bit and knife. Then, most importantly, tighten all the screws very well. Clamp the stock down, and just like using a hole saw, don’t rush it and only use slow speeds. Now that you have your circle cutter guard, your hands should be at bay. Start feeding the cutter into the stock steadily. Again, just like using a hole saw, depending on the thickness, you can use the two-sided method.
Support for drilling round stock
Drilling a hole or a series of holes along a cylindrical object is very hard to achieve with only clamps. An old trick is to make a V-shaped block and clamp it to your drill press table to help you stabilize round objects, such as dowels, pipes, and furniture legs.
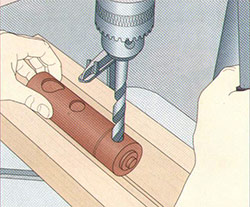
You can make a V-block that is long enough to support your workpiece. For example, you can make it by using a 2 x 4 or a 2 x 6 block. Then with a table saw, miter saw, or circular saw, you set the blade to 45 degrees and cut a V-shaped groove in the block. Cut down only halfway and repeat the process until you get that V shape out of the center.
This way, when you position the drill bit to a cylindrical object sitting in the jig, then you would know that you are at the top dead center. Just align the drill bit with the center of the V-groove and clamp it to the drill press table. Then place your workpiece, clamp it firmly, and start drilling.
You can also make a clamping bar with a V-cut to use it with dowels or round objects. The clamping bar will help you squeeze small workpieces against the fence. You can make it out of plywood and predrill a screw hole on one end. Then, screw it directly on the table where you need and use this pivoting arm to hold the workpiece against the fence while keeping your hands out of the way.
If you are not excited about making a V-block out of wood, then you can also find ready self-centering V-block jigs online.
Also see – miter saw reviews – circular saw reviews
Make dovetails or mortise and tenon joints
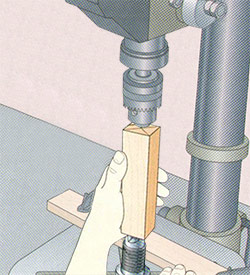
Mortise and tenon joints are widely used in furniture to make tables, benches, and beds. They form an ecstatic fit and a strong bond. A mortise cut can be made using a chisel and a hammer or by using some power tools. The most precise and efficient would be a dedicated mortiser machine. However, if you only have a few joints to make, then you can resort to other tools in your workshop, such as a wood router, table saw, and drill press.
Many drill press manufacturers offer mortising attachments of various sizes and shapes. A mortising attachment has a square chisel, and a protruded auger bit inside. The bit drills the hole, and the chisel squares the edges.
A mortising attachment allows for much cleaner mortise walls that need less chisel work. However, if you don’t have a mortising attachment, then you can use a Forstner bit to remove excess wood in the mortise, and then square up the corners with a chisel.
To do this, first mark the measurements of the mortise and mark the center-line. The width of the mortise should be equal to the diameter of the drill bit. Install the bit in your drill press and set the depth stop to match the depth of the mortise depth line. Then lift the drill press table and align the bit with the layout lines at one end of the mortise and clamp everything down. Now start with drilling a hole at each end of the mortise. Overlapping holes sometimes leaves uneven cuts. So it’s better to continue with a series of spaced holes until you completely drill the mortise.
It’s essential to keep unclamping and clamping your workpiece to reposition it for each hole. Of course, having a fence can make your job a lot easier. You can also use a cross-sliding vise. Clamp your workpiece to it and then clamp the whole assembly to your drill press table. A cross-slide vise can easily move your workpiece from side to side. Also note, to get a flat bottom for your mortise, it’s best to use thick, short, flat drill bits. You can also use an end mill, which allows you to cut sideways.
After clearing the excess wood from the mortise, you have the option to keep the corners round or square them up. To get a mortise with square corners, use a wooden mallet and a wide sharp chisel. Carefully tap to maintain the dimension and get a perfect fit for the tenon. You can also use this method to make dovetails.
Also see – router reviews
Make a sanding machine out of a drill press
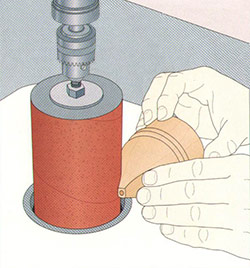
If you don’t have a dedicated sander and have a quick job at hand, then you can use your drill press as a sanding machine. By attaching a sanding drum to your drill press, you get similar functions to a spindle sander.
Sanding drums are available in various diameters. Each drum has a shaft like a regular drill bit with a drum on end. The drum has sandpaper on it, and you can replace the sandpaper easily with different grits. You can also make a sanding drum yourself by stacking a set of glued plywood disks on a rod and a fixed bearing, then fit sandpaper.
That said, drill press models are not all designed to handle this type of pressure. The main job of a drill press is to handle vertical forces. However, as you push against the sanding drum, you apply horizontal forces.
The trick here is to support the bottom of the drum to help secure it in place as you push against it. There are a few jig ideas that you can make for your drill press table to fit the sanding drum.
One of them is to create a sanding platform with a large counterbored hole. The outer hole is large enough to fit the size of the drum you’re using. And the inner hole is enough to fit the size of the bearing. Then you raise the drill press table so that the bearing sits in the hole and clamp everything down. Now when you sand something, the bottom of the drum is supported to help handle the side pressure, and the shaft doesn’t take any lateral load.
Experience with different speeds then check your workpiece to make any necessary adjustments. You will find that this method is primarily useful for interior cuts and exterior curves rather than straight surfaces. There is also a sanding flap wheel for irregular shapes. However, if your drill press is powerful enough, then you can experiment and create a belt sander or a disc sander jig.
Woodturning with a drill press lathe
If you have a project that requires turning small wood items, then you can resort to using your drill press as a vertical lathe. Nothing can replace a wood lathe, but if you have one job at hand that requires simple woodturning, then this technique could help.
That said, modifying a power tool and using it for tasks other than what it is designed for, can be potentially dangerous. A drill press is designed to take downward loads rather than side loads. Also, vertical wood turning doesn’t keep your hands in an ideal position. With the vertical movement and the side load, tripping the machine or risking your fingers can happen. So attempt these modifications at your own risk. Note that this method is much slower, and it may be limited to only small projects.
Woodturning on a drill press requires three significant components, a tailstock, a headstock, and a tool rest. The tailstock is the live center that holds the workpiece to a drill press table and rotates it freely on a stable axis. The headstock is the spur center that attaches the workpiece to the chuck of a drill press. And the tool rest is the part that provides a stable place to rest your shaping tool while turning the workpiece.
You can make a live center, spur center, and tool rest using some bolts, nuts, and washers, or you can purchase a ready lathe attachment. A lathe attachment includes a rod that aids as a tool rest, a live center for the drill press table, a spur center for the drill press chuck, and a mini screw.
To make a lathe attachment, trim a threaded rod or a bolt to get a sharp pointy tip. Attach the bolt to the center of your drill press table using two lock nuts and two washers. Use a screw and a tee-nut and attach them to the drill press chuck. You can also attach a large bolt to the corner of your drill press table to aid as a tool rest.
With these pieces in place, prepare to test your setup. Start by trimming your workpiece and drilling holes to the top and bottom. Position it in the drill press and make sure it fits properly into the live center and the spur center. Use a mallet to knock the workpiece into the live center and lift the drill press table, so the workpiece is securely held with the spur center. Lock everything down and tighten the chuck. Now turn the workpiece by hand a few times to check if it is centered and spins smoothly.
Finally, take your time and work slowly at medium speeds. If you start to hear a squeaking sound, then you can add a drop of oil or lubricant to the bearings. Use wood files, rasps, and other proper carving tools. Keep your tools sharp, and be mindful of the pressure you put on the workpiece. Too much load may move the workpiece out of place, kick the chuck, or even knock the drill press on the back or side.
Also see – lathe reviews
The Verdict
The most important tip of all is to remember the necessary safety precautions. Whether an expert or a beginner, pay maximum attention while working and always read the user manual of your products for proper usage. These warnings can be tedious, but using power tools can be dangerous, so be attentive and stay safe.
Overall, we hope these drill press tips and tricks were useful for you. Pick a powerful enough drill press to handle these techniques and hacks. Some of these tricks will require some drill press accessories and supportive tools. This way, you can be more accurate when using your drill press and also achieve various other tasks.